 |
|
|
|
|
|
|
|
|
|
|
|
|
|
|
|
|
|
|
|
|
|
|
|
|
|
|
|
|
|
|
|
|
|
|
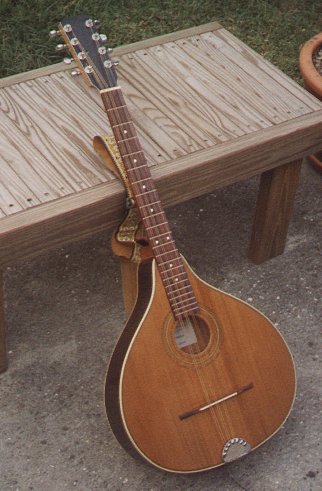
| Lark in the Morning Cittern |
|
|
|
Makeover Project |
|
|
|
 |
|
|
|
Lark in the Morning, at the bottom of their British Isles Stringed Instruments page, lists their Lark's Bargain Celtic Cittern, item number MAN050 for $295.00. I bought one of these and when I received it I was pretty pleased with it, except for the tuners. They were JUNK, like the ones on the first guitar I ever owned (a $35 Silvertone I bought at Sears in 1961). On all the guitars I have owned, I have changed over to Grover Rotomatic tuners, and have been very pleased. So I began to think about changing the pegs almost immediately after I received the instrument. |
|
|
|
While I was dreaming and scheming toward the day I would switch the tuners out, I began to learn how to play the instrument. The tuners, it seems, were good enough to put the strings in tune and keep them there, at least for the time being. It was during this process that I discovered two more things:
1. The strings were too close together for my fingertips to make chords cleanly.
2. I never could work in the fifth course of strings into my melody playing.
|
|
|
|
So finally after a year or so, I decided to tackle the project to replace the tuners. But I was unable to find tuners I liked to fit the slotted (classical guitar style) head. At the same time, I decided to reconfigure to 4 courses instead of 5, to give me the little extra space for my fingertips that I needed. So here is the plan that I came up with. It took me about 20 hours of labor (most of which was spent fitting the slots in the nut and saddle) and something under $100 in materials (and I have 4 mini Grovers left over). |
|
|
|
|
|
|
|
Head rework:
1. I mail ordered from Stewart MacDonald two sets of 3/3 mini-Grover tuners, a sheet of b-w-b pick guard material, a bone nut blank, and a bone bridge saddle blank.
2. I took off the original tuners, and carefully cut and fitted two blocks of mahogony to fit snugly and fill the slots as completely as possible. I epoxied these in place with slow cure (24 hour) epoxy. |
|
 |
|
|
|
|
|
3. To accomplish the dual purpose of filling the holes drilled for the original tuners, and to further anchor the filler blocks in place, I drilled all the way through the head following the original holes, and glued hardwood dowels into these holes. At the same time I filled the holes from the tiny anchor screws by gluing in toothpicks. |
|
|
|
 |
|
|
|
 |
|
|
|
|
|
4. With a marking guage, I scribed a line all the way around the head at a thickness of 1/2 inch, measuring from the back surface of the head. With chisels and a block plane, I removed the extra wood. Most of what was removed was a layer of wood glued to the head to hide the joint between the neck stock and the head stock. This piece also held the nut in place at the top of the fingerboard. I also removed a little more wood off the back of the headstock with the belt sander.
5. I replaced the wood from the top of the head with a piece of pickguard material to yield a final thickness of 1/2 inch, which seemed about right for the grover mini's to extend through the head properly. |
|
|
|
|
|
 |
|
5. The rest you can probably imagine for yourself, laying out the hole positions, drilling and mounting the tuners, cutting and fitting the nut and saddle, laying out the string slots, etc. I have another picture of that process yet to be developed that will be worth 1k words, as they say. Look for it here in the next few weeks. |
|
|
|
So here is the finished project. It is now as it will stay until I can afford a fine handbuilt 'zook (Florida does have the Lotto, you know). It's no match for one of those, but it is now as good as I know how to make it without investing an amount of cash impossible to justify. |
|
|
 |
|
|