|
PICTORIAL DRAWING AND
PERSPECTIVE
|
"Pictorial drawing" is a term
used to denote several methods used to draw representations of objects. It is
important for students and designers to develop an understanding of the methods
used to accomplish these drawings. There are three basic methods that are
discussed below. Please review the information and use it to complete any written
assignment that accompanies this topic.
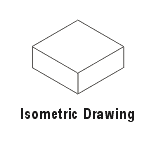 |
"Isometric" drawings are drawings usually rendered by a
draftsperson or done in a Computer Assisted Drafting (CAD) software
program for technical purposes. The identifying characteristic of this
drawing is that it consists of 30 degree and 60 degree angles. There is a
special paper that is produced that allows the production of these
drawings on top of the printed grid. It has all diagonal lines printed on
it instead of a square grid.
|
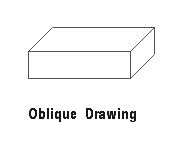 |
"Oblique" drawings are also drawings usually
rendered by a draftsperson or done in a Computer Assisted Drafting (CAD)
software program. The term "oblique" means "diagonal" or
"slanted". The identifying characteristic of this drawing is that
it consists of a fixed angle projecting from a horizontal plane. |
|

Perspective
|
Perspective drawings are those that describe an object
as it would be seen by the eye. It allows a feeling of depth, and is
actually an "illusion" of a three-dimensional object on a
two-dimensional plane. There are several types of perspectives that are
named by how many "vanishing points" are involved in the
drawings. Popular comic book artists may use three point perspectives a
lot, while the designer would use it very infrequently. The two most basic
types that you should be familiar with are "one-point" and
"two-point" perspective. A closer examination of these two types
is included below. You will do some exercises with your instructor to help
you learn the difference between the two.Review the illustrations and
explanations included below.
|
|
|
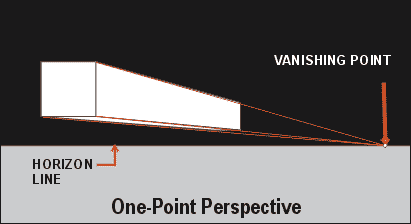
In a one-point perspective, the major
components are the object, the "horizon line", and the "vanishing
point". In the illustration above, the square is drawn above the horizon
line. Then, guidelines are drawn to the vanishing point. All points on the
square are joined with the vanishing point by convergent drawn lines (convergent
lines come together...as opposed to parallel lines that will never come
together!). This then aids the artist to draw in the "back" side of
the object as a single vertical line. When you do the exercises with your
instructor, you will gain a better understanding of all the components involved.
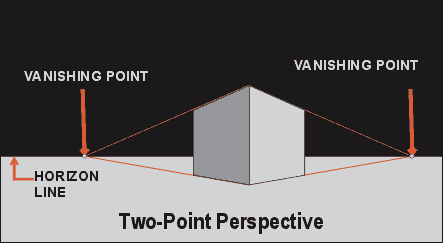
In a two-point perspective, the artist starts
with NO square, but only a single line. However, two vanishing points are
involved. The two points are used on the line to draw convergent lines to each
vanishing point. Then, two vertical lines complete the illusion of sides on the
object. This is actually an easy rendering once you know how it is done. Once
again, you will gain a better understanding after completing some simple
exercises with your instructor.
You will find that some of your software will
have features and commands or tools that refer to perspective. You will be
working in that software to complete some perspective illustrations for your
portfolio.
That about does it for the information on
pictorial drawing and perspective. Be sure to pay attention to this and the
exercises in class, as you will be tested on the material AND your ability to
draw both one and two point perspectives.
Back to "Electronic
Art & Design" Page

